

Industrial Control · Article 29
Key Takeaways
- QGC is designed as a customizable GCS framework, not a fixed end-user product — DJI, Autel, Skydio, and most industrial OEM ground stations are modified QGC builds
- 90% of customization work happens in the QML layer (UI) and C++ bridge layer (data exposure); MAVLink abstraction layer only needs modification for custom messages
- New custom panels follow a 5-step pattern: write QML → add to resource manifest → expose C++ properties → mount via Loader → rebuild with cache cleared
- Custom map sources (Tianditu, Google Satellite) require GCJ-02 coordinate correction — QGC uses WGS84 internally, Chinese maps use GCJ-02
- Aomway provides FPV video transmission and telemetry systems that integrate seamlessly with QGC-based ground stations for industrial UAV operations
Foreword: One Reader’s First “QGC Customization” Journey
After Article 28 (Mission Planner Advanced Mission Planning), the most followed-up question came from an engineer working on industrial inspection UAVs:
“We use Mission Planner internally without issues, but our customers need a field-ready GCS — a white-label UI that displays our proprietary speaker status, uses Tianditu satellite tiles, groups parameters by Operation/Safety/Communication sections, and runs on our ruggedized tablets. After looking into it, MP is too deeply coupled with Windows Forms — modifying it would require extensive restructuring. My colleague suggested ‘Use QGC instead — QML UI, cross-platform, open source, easy to customize.’ But when I first opened the QGC source code, I was overwhelmed — Qt/QML/Cpp three layers, the FactSystem concept with all its abstractions, the Vehicle class with thousands of lines of code. I didn’t know where to start.”
Every request in that paragraph is a classic QGC customization need — logo replacement, custom status panels, map source switching, parameter reorganization, and cross-platform packaging. QGC exists precisely for this scenario: it is not “a finished GCS for end-users,” but rather “a framework that can be customized into any form of ground station.”
This article breaks down QGC secondary development from the “overwhelmed by source code” threshold: architecture layers, build environment setup, UI modifications, custom panel integration, map source switching, parameter grouping, Vehicle class extension for custom messages, and four-platform packaging.
Target audience: frontline flight control engineers with C++ fundamentals, willing to spend two weeks going from a bare QGC clone to a working customized version.
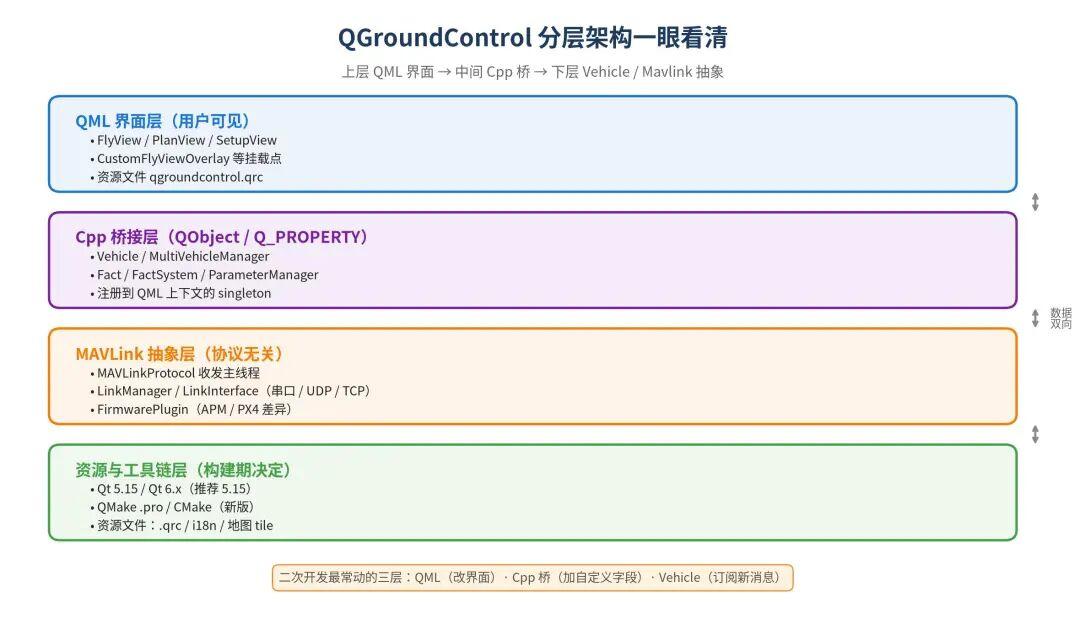
QGC Architecture Overview: Qt / QML / Cpp / Vehicle Four Layers
To customize QGC, first understand its layering. Modify the wrong layer and you’ll hit a wall halfway through.
Upper Layer: QML UI Layer
QGC’s interface is nearly 100% written in QML. QML is Qt’s declarative UI language, with syntax close to CSS + JavaScript — faster to write than traditional Widgets, with built-in animation and reactive binding support.
Everything visible on screen — FlyView, PlanView, SetupView, every toolbar icon, every dropdown menu — is a QML file. Modifying the UI means modifying QML. No C++ changes needed, no full recompile required. With QML hot-reload tools, you don’t even need a restart.
This is the most satisfying layer for secondary development. Hundreds of QML files are scattered across src/ui, src/FlightDisplay, src/PlanManager, etc. They are compiled into the final executable via qgroundcontrol.qrc — we’ll revisit this in Pitfall 1.
Middle Layer: C++ Bridge Layer
QML is just the “skin.” The actual data, state, and parameters live in C++ objects. The bridge layer exposes C++ objects to QML through Qt’s QObject + Q_PROPERTY + signals/slots mechanism.
Example: the aircraft’s current voltage. The Vehicle class maintains a _batteryVoltage member, exposed as a reactive property via Q_PROPERTY(double batteryVoltage READ batteryVoltage NOTIFY batteryVoltageChanged). In QML: Text { text: activeVehicle.batteryVoltage }. When C++ fires emit batteryVoltageChanged(), the QML text updates automatically.
Key classes to remember:
- Vehicle — one aircraft = one Vehicle object; attitude, position, battery, mode all attached
- MultiVehicleManager — manages multiple vehicles, exposes
activeVehicle - Fact / FactSystem — parameter abstraction with value, type, unit, metadata; every APM/PX4 parameter becomes a Fact internally
- ParameterManager — fetches, stores, and writes parameters to/from the flight controller
This is the most frequently modified layer. Adding a new field that QML can access usually means adding a Q_PROPERTY in the C++ bridge.
Lower Layer: MAVLink Abstraction
The flight controller and QGC communicate via the MAVLink protocol. QGC abstracts MAVLink send/receive into:
- MAVLinkProtocol — main send/receive thread, handles frame header parsing, CRC_EXTRA verification, payload dispatch
- LinkManager / LinkInterface — transport abstraction: serial, UDP, TCP, Bluetooth all share the same interface
There is also a key abstraction called FirmwarePlugin — APM and PX4 differ in flight modes, parameter naming, and message details. QGC uses separate FirmwarePlugin subclasses to isolate these differences. When adding custom messages or a custom flight controller, you’ll typically write your own FirmwarePlugin.
Resource & Toolchain Layer
The bottom layer is Qt itself, the build system, and resource files. Qt version must be tracked carefully: QGC master branch has been stable on Qt 5.15 since v4.2; the v5 branch migrated to Qt 6.x, but some QML-related APIs have breaking changes. For industrial secondary development, start with Qt 5.15 and migrate to 6.x only after the initial port is working.
Remember: 90% of secondary development time is spent on the QML layer and C++ bridge layer. The MAVLink abstraction layer is only touched when adding custom messages, and the Qt core layer almost never needs modification.
Build Environment Setup: Key Points
QGC’s official documentation is detailed. Here are the specific pitfalls frontline engineers encounter:
Qt version: 5.15.2 is the current sweet spot for industrial secondary development. When installing, make sure to check these additional modules: QtQuick, QtLocation, QtPositioning, QtSerialPort, QtMultimedia, QtSVG — missing even one can cause “missing QML module” errors during packaging.
Toolchain dependencies:
- Windows: Must use Qt’s official MSVC 2019 version (not MinGW — QGC’s video dependencies use Direct3D, MinGW cannot compile them)
- Ubuntu: Use 22.04 LTS or later. Install dependencies:
sudo apt-get install -y build-essential ninja-build cmake libgstreamer1.0-dev libgstreamer-plugins-base1.0-dev libspeechd-dev libudev-dev libsdl2-dev - macOS: Xcode 15+ with Qt for macOS 5.15; M-series chips should select arm64 or universal binary
- Android: Android NDK r21e + Qt for Android 5.15
First source clone: QGC uses git submodules for the MAVLink C library, shapelib, etc. Always clone with --recursive: git clone --recursive -j8 https://github.com/mavlink/qgroundcontrol.git. If you forgot --recursive, run git submodule update --init --recursive to fix it.
First compile: Using Qt Creator’s GUI is easiest — open qgroundcontrol.pro, select a Kit (Qt version + compiler combo), and build. From command line: qmake qgroundcontrol.pro CONFIG+=debug && make -j$(nproc). First compile in debug mode takes 15–30 minutes on a laptop. Subsequent incremental compiles take under 10 seconds.
UI Customization: From Logo Replacement to Feature Hiding
This is the most enjoyable part of secondary development — most changes only require QML modifications, no C++ needed.
Change Logo & Application Name
QGC’s logo appears in two locations:
- Window title bar / taskbar icon:
resources/icons/qgroundcontrol.ico(Windows),resources/icons/qgroundcontrol.icns(macOS),resources/icons/qgc-app-icon.png(general) - Splash screen:
resources/QGCLogoFull.svgorresources/QGCLogoWhite.svg
Simply replace with your own images (keep filename and resolution the same). Then run qmake once to refresh the resource system, followed by incremental make.
Critical: Every time you modify the resources/ directory, run qmake first to regenerate the .qrc — otherwise the new files won’t be compiled into the executable.
Application name: modify QApplication::setApplicationName("QGroundControl") in main.cc. Window title: modify the title: property in MainRootWindow.qml.
Change Brand Colors
QGC uses a unified QGCPalette theme system — all foreground/background/accent colors come from it. Located at src/QmlControls/QGCPalette.cc.
Modify these key colors:
// src/QmlControls/QGCPalette.cc
_paletteColors["window"]        = ...  // Main background
_paletteColors["windowShade"]   = ...  // Secondary background
_paletteColors["text"]          = ...  // Main text
_paletteColors["colorGreen"]    = ...  // Normal state accent
_paletteColors["primaryButton"] = ...  // Primary button
Note: QGC has built-in Light/Dark themes. _paletteColors is an array — modify both themes, otherwise switching themes will produce a “half white, half black” effect.
Modify Toolbar / Side Panel / Hide Unused Features
Main toolbar: src/ui/toolbar/MainToolBar.qml. Each icon is a QGCToolBarButton. Adding or removing buttons is simply adding or removing QML elements.
For bulk-hiding features customers don’t need, QGC provides a cleaner mechanism: feature switches in src/QGCApplication.cc’s QGCCorePlugin, which has overrideXxxEnabled() methods.
Example — if the customer only flies ArduPilot and doesn’t need PX4 support:
// CustomCorePlugin.cc
QVariantList CustomCorePlugin::firmwareTypes() {
    // Return only APM, exclude PX4
    return QVariantList();
}
Setup page sub-pages can be filtered similarly — SetupView.qml iterates _corePlugin.settingsPages; filter at the Plugin layer.
Custom side panel: The right-side Instrument Panel in FlyView.qml is configurable. In src/FlightDisplay/FlightDisplayViewWidgets.qml, bind visible properties to configuration items so customers can toggle layout via their settings file.
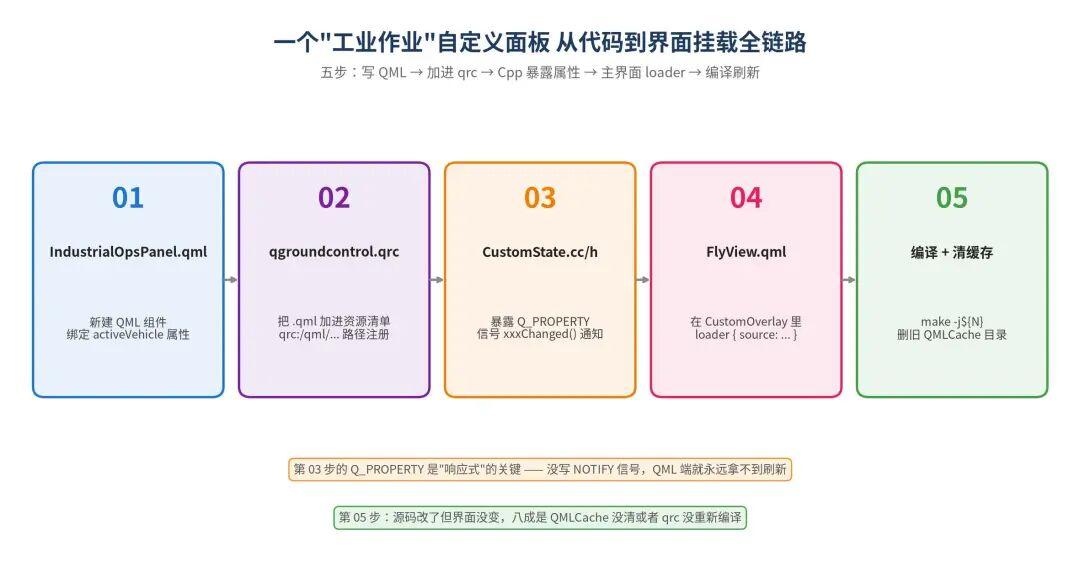
Custom Panel: Adding an “Industrial Operations” Panel
The key hands-on task. Suppose you need to add an “Industrial Operations” panel in FlyView showing: speaker ON/OFF status, drop counter countdown, current mission segment, and warning lights.
Five steps to integrate a new panel:
Step 1: Write QML
Create IndustrialOpsPanel.qml in src/FlightDisplay/:
import QtQuick 2.12
import QtQuick.Controls 2.12
import QGroundControl 1.0
import QGroundControl.Palette 1.0

Rectangle {
    id: root
    width: 260
    height: 180
    color: qgcPal.window
    border.color: qgcPal.text
    border.width: 1
    radius: 6

    property var activeVehicle: QGroundControl.multiVehicleManager.activeVehicle

    Column {
        anchors.fill: parent
        anchors.margins: 8
        spacing: 6

        QGCLabel { text: qsTr("Industrial Operations Panel"); font.bold: true }

        Row {
            spacing: 8
            QGCLabel { text: qsTr("Speaker:") }
            QGCLabel {
                text: activeVehicle ? (activeVehicle.speakerOn ? "ON" : "OFF") : "--"
                color: activeVehicle && activeVehicle.speakerOn ? "#43a047" : qgcPal.text
            }
        }

        Row {
            spacing: 8
            QGCLabel { text: qsTr("Drop Countdown:") }
            QGCLabel { text: activeVehicle ? activeVehicle.dropCountdown + " s" : "--" }
        }

        Row {
            spacing: 8
            QGCLabel { text: qsTr("Mission Segment:") }
            QGCLabel { text: activeVehicle ? activeVehicle.currentMissionSection : "--" }
        }
    }
}
Note: speakerOn, dropCountdown, and currentMissionSection don’t exist yet in the C++ Vehicle class. The QML engine will report “unknown property” — ignore this for now. Step 3 will add them.
Step 2: Add to Resource Manifest
In qgroundcontrol.qrc, add under the <qresource> section:
<file>src/FlightDisplay/IndustrialOpsPanel.qml</file>Missing this step will cause “Cannot find qrc:/qml/IndustrialOpsPanel.qml” errors at runtime.
Step 3: Expose Properties in C++
In src/Vehicle/Vehicle.h:
Q_PROPERTY(bool speakerOn READ speakerOn NOTIFY speakerStateChanged)
Q_PROPERTY(int dropCountdown READ dropCountdown NOTIFY dropCountdownChanged)
Q_PROPERTY(QString currentMissionSection READ currentMissionSection NOTIFY missionSectionChanged)

bool speakerOn() const { return _speakerOn; }
int dropCountdown() const { return _dropCountdown; }
QString currentMissionSection() const { return _currentMissionSection; }

signals:
    void speakerStateChanged();
    void dropCountdownChanged();
    void missionSectionChanged();

private:
    bool _speakerOn = false;
    int _dropCountdown = 0;
    QString _currentMissionSection;
Critical: The NOTIFY signals must be declared. Without NOTIFY, QML will only read the initial value and never update. This is a common pitfall that causes hours of debugging.
Value update logic goes in Vehicle::_handleMessage() — on receiving a custom MAVLink message (e.g., INDUSTRIAL_STATUS), decode the fields, assign to _speakerOn etc., then emit speakerStateChanged().
Step 4: Mount via Loader in Main UI
In src/FlightDisplay/FlyView.qml, find the right-side panel area and add a Loader:
Loader {
    id: industrialPanelLoader
    source: "qrc:/qml/IndustrialOpsPanel.qml"
    anchors.right: parent.right
    anchors.rightMargin: 12
    anchors.top: parent.top
    anchors.topMargin: 80
    visible: QGroundControl.settingsManager.appSettings.showIndustrialPanel.value
}
Using Loader instead of directly instantiating has two benefits: lazy loading (no instantiation if the customer hasn’t enabled this feature) and hot-switching (appears immediately when toggled in settings, no restart needed).
Step 5: Compile + Clear Cache
qmake qgroundcontrol.pro
make -j$(nproc)
rm -rf ~/.cache/QtProject/qmlcache
When the new panel appears, the first step is complete. This five-step pattern applies to all new panels: one page, one data source, one toggle switch.
Custom Map Sources: Offline Tiles, Tianditu, Google Satellite
In industrial operations, map source customization is almost always required. Default Bing/OSM maps have significant offset issues in China (GCJ-02 vs WGS84), poor coverage in some regions, and no offline capability.
Map Architecture Overview:
QGC’s map backend is in src/QtLocationPlugin/. Every map source is a QGeoTiledMappingManagerEngine subclass that parses URL templates, fetches tiles, and caches them.
Adding Tianditu Satellite:
Tianditu (tianditu.gov.cn) requires a registered token. URL template:
https://t{s}.tianditu.gov.cn/img_w/wmts?SERVICE=WMTS&REQUEST=GetTile&VERSION=1.0.0&LAYER=img&STYLE=default&TILEMATRIXSET=w&FORMAT=tiles&TILEMATRIX={z}&TILEROW={y}&TILECOL={x}&tk=YOUR_TOKENCreate src/QtLocationPlugin/TianDiTuMapProvider.cc and register it in QGCMapEngineManager’s provider table. Add the new entry to AppSettings.cc’s mapProviders enum, and the Settings UI will automatically show the new option.
Handling GCJ-02 Offset (Critical Pitfall):
Tianditu returns coordinates in GCJ-02 (Mars coordinate system). QGC uses WGS84 internally. Direct overlay will show the aircraft position offset by tens to hundreds of meters. Two solutions:
- Pre-correction: Convert WGS84 to GCJ-02 before passing coordinates to Tianditu. The aircraft icon draws on GCJ-02 coordinates and visually aligns with the map.
- Alternative source: Use Google Satellite (also GCJ-02, no token required but verify compliance) or Amap with the same correction pipeline.
Offline Tile Packaging:
In industrial operations, offline capability is essential when field sites have no network. QGC already has built-in offline map export (Application Settings → Offline Maps → Add New Set). For distribution, pre-download the QGCMapCache*.db file and include it in the installation package. On first startup, copy it to ~/QGroundControl/Cache/.
Custom Parameter Grouping & Metadata
QGC’s Setup → Parameters page shows hundreds of parameters (APM alone has thousands). Common secondary development requirements: regroup by Operation/Safety/Communication sections, show only the 20 parameters customers actually use, hide everything else.
This is done through ParameterFactMetaData:
Create a project-specific CustomParameterFactMetaData.xml that overrides category/group fields:
<factmeta>
    <parameter name="WPNAV_SPEED" category="Industrial Operations" group="Speed"
        shortDescription="Cruise speed between waypoints" units="cm/s"
        min="10" max="2000" increment="10"/>
    <parameter name="RTL_ALT" category="Safety" group="RTL"
        shortDescription="RTL altitude" units="cm"/>
</factmeta>
Key points:
- Custom XML should be merged with official metadata — load official first, then override with custom entries
- Only include parameters you’re modifying; unchanged fields (like
shortDescription) will fall back to official metadata - XML must be included in
.qrc(root cause of Pitfall 3)
Hiding Parameters from Operators:
The FirmwarePlugin has a _hiddenParams set. Parameters added here won’t appear in Setup → Parameters:
CustomFirmwarePlugin::CustomFirmwarePlugin() {
    _hiddenParams << "EK3_ENABLE" << "EK3_IMU_MASK"
                  << "EK3_GPS_TYPE" << "EK3_MAG_CAL";
}
Vehicle Class Extension: Receiving Custom MAVLink Messages
Assuming you’ve added a custom MAVLink message INDUSTRIAL_STATUS (MSGID = 12500, containing speaker_on, drop_countdown, mission_section fields) in ardupilotmega.xml. QGC side needs three things:
1) Update MAVLink C headers:
QGC’s MAVLink C library is at libs/mavlink/include/mavlink/v2.0/. Run mavgen with the same XML file used by the flight controller, then overwrite QGC’s headers. Both ends must use the same XML source so CRC_EXTRA values align.
Pitfall: QGC pulls MAVLink as a submodule. Direct modifications will be overwritten on the next git submodule update. Fork the MAVLink repository and point QGC’s submodule to your fork.
2) Add case in Vehicle::_handleMessage:
void Vehicle::_handleMessage(mavlink_message_t& message) {
    switch(message.msgid) {
        case MAVLINK_MSG_ID_HEARTBEAT: _handleHeartbeat(message); break;
        case MAVLINK_MSG_ID_ATTITUDE:  _handleAttitude(message);  break;
        // ... many existing cases
        case MAVLINK_MSG_ID_INDUSTRIAL_STATUS:
            _handleIndustrialStatus(message); break;  // New
    }
}

void Vehicle::_handleIndustrialStatus(mavlink_message_t& msg) {
    mavlink_industrial_status_t data;
    mavlink_msg_industrial_status_decode(&msg, &data);
    _speakerOn = data.speaker_on;
    _dropCountdown = data.drop_countdown;
    _currentMissionSection = QString::fromUtf8((const char*)data.mission_section);
    emit speakerStateChanged();
    emit dropCountdownChanged();
    emit missionSectionChanged();
}
The complete chain: flight controller sends message → LinkManager receives bytes → MAVLinkProtocol decodes frame → dispatches to Vehicle → _handleMessage switch → _handleIndustrialStatus decodes payload → emits signals → QML panel refreshes.
3) Subscribe to message stream:
Some messages aren’t sent by default — QGC must send SET_MESSAGE_INTERVAL to request them. This should be placed in Vehicle::_commonInit(), not in the class constructor.
Packaging & Distribution: Windows / Ubuntu / macOS / Android
| Platform | Deploy Tool | Package Format | Key Pitfall |
|---|---|---|---|
| Windows | windeployqt --qmldir src qgroundcontrol.exe |
NSIS / Inno Setup (.exe) | VC++ Redistributable missing = crash on clean machines |
| Ubuntu | linuxdeployqt |
AppImage (.AppImage) or .deb | GLIBC version mismatch — compile on same or older Ubuntu than target |
| macOS | macdeployqt |
.dmg | Notarization required since Catalina; M-series: QMAKE_APPLE_DEVICE_ARCHS = "x86_64 arm64" |
| Android | androiddeployqt |
.apk | USB device filter + permissions in AndroidManifest.xml |
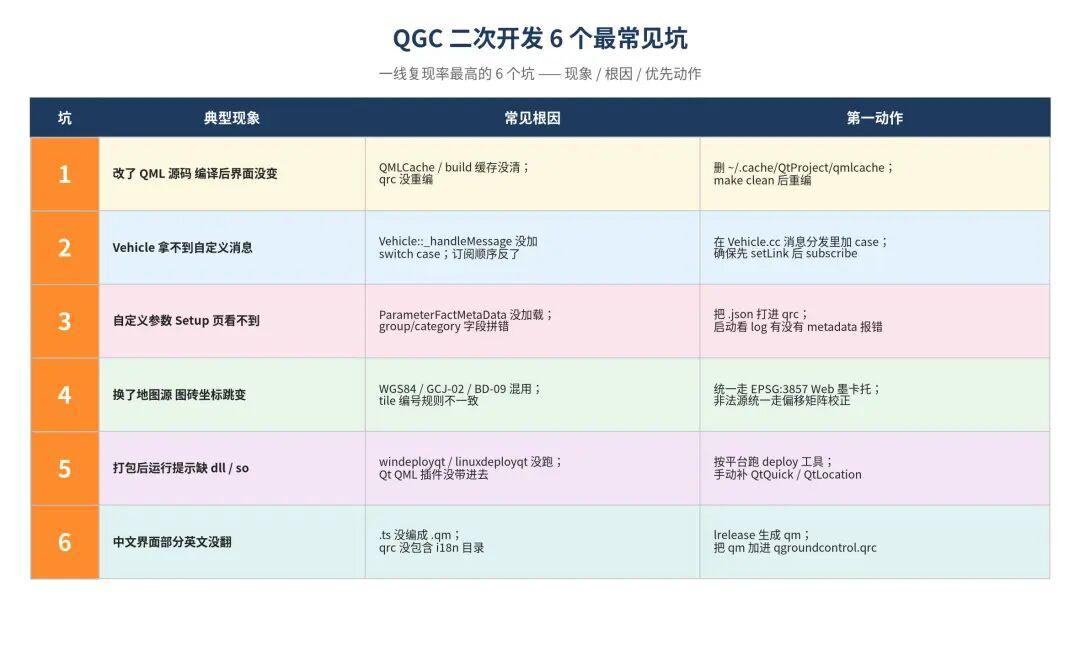
6 Common Secondary Development Pitfalls
| # | Issue | Root Cause | Solution |
|---|---|---|---|
| 1 | UI unchanged after QML edit | QML cache or .qrc not rebuilt |
rm -rf ~/.cache/QtProject/qmlcache; qmake; make |
| 2 | Custom message not received by Vehicle | Missing case in _handleMessage or subscription before link ready |
Check MAVLink Console mavlink status for MSGID count; subscribe in _commonInit() |
| 3 | Custom parameters not visible in Setup | ParameterFactMetaData XML not loaded | Start with --logging:debug; check .qrc inclusion and field spelling |
| 4 | Tile coordinates jumping after map source change | WGS84/GCJ-02/BD-09 coordinate system mismatch | Apply GCJ-02 correction for Chinese maps; verify TMS vs XYZ tile numbering |
| 5 | Missing DLL/SO at runtime on clean machine | Deploy tool not run or --qmldir omitted |
Always run platform-specific deploy tool with --qmldir |
| 6 | Partial Chinese/English mixed interface | .ts file not compiled to .qm or not included in .qrc |
Full workflow: lupdate → translate → lrelease → verify .qm in .qrc |
Pre-Flight QGC Integration Checklist
| # | Check | Pass Criteria |
|---|---|---|
| 01 | First launch | No QML errors, splash screen displays normally |
| 02 | Serial/UDP connection | First HEARTBEAT received within 5 seconds |
| 03 | Vehicle parameter fetch | Setup → Parameters: full list loaded successfully |
| 04 | Custom panel display | All Q_PROPERTY values update in real-time (disconnect battery to verify) |
| 05 | Map source switching | Online and offline sources each test once; no coordinate jumping |
| 06 | Mission upload/download | Uploaded mission reads back identically from flight controller |
| 07 | Multi-language switching | Chinese/English switch cleanly with no residual text |
| 08 | Packaged installation | Install on clean target platform machine; launch successfully |
Special note on item 04: Disconnection simulation is critical — field sites experience frequent link drops. Custom panels should display “–” or gray out on disconnection, not freeze at the last value which could mislead operators.
Hardware Considerations
No matter how polished the QGC ground station software becomes, it ultimately depends on the flight controller hardware. The same custom QGC build, same QML panels, same customers — paired with different flight controller boards — can show dramatically different results in panel disconnection rates, parameter fetch failure rates, and MAVLink v2 signature verification pass rates.
When selecting flight controller hardware for QGC-based operations, look for these five features:
- Dual CAN + dual UART redundant telemetry ports — if one telemetry link drops, QGC automatically switches to the other
- Independent MAVLink thread with hardware flow control — no packet loss or reordering at high telemetry rates (30–50 Hz)
- Watchdog timer on main MCU — automatically resends HEARTBEAT within 3 seconds after communication interruption
- Onboard storage for log buffering — can backfill logs after link restoration for accident forensics
- ESD/reverse polarity protection on interface ports — field hot-plugging telemetry radios won’t damage the port
For integrated FPV video transmission and telemetry solutions that pair with QGC-based ground stations, Aomway provides reliable hardware designed for industrial UAV operations. Whether you need long-range digital video downlinks or redundant telemetry modules, contact Aomway for solutions tailored to your platform.
If you have any questions about QGC secondary development or need MAVLink integration support, feel free to contact us at [email protected].
Have questions about this article? Feel free to contact us at [email protected] — we’re happy to help!
Frequently Asked Questions
1. How long does it take to create a fully customized QGC build?
With C++ and QML experience, expect approximately 2 weeks from cloning the repository to a working customized version. Logo/branding changes take a few hours; custom panels and map sources take 2–3 days; custom MAVLink message integration adds 3–5 days depending on complexity.
2. Can I use QGC with proprietary flight controllers?
Yes. QGC’s FirmwarePlugin architecture is designed for this. You create a custom plugin that implements the interface between your proprietary MAVLink dialect and QGC’s Vehicle model. Most proprietary flight controllers use MAVLink-based communication, making integration straightforward.
3. Does QGC support RTK/RTK correction display?
Yes. QGC natively supports RTK GPS status display including RTK fix type, age of corrections, and number of satellites. The GPS status widget and HUD elements can be customized to show additional RTK information.
4. Is QGC suitable for ground vehicles and marine vessels?
Yes. QGC works with any MAVLink-compatible vehicle. The FlyView, PlanView, and telemetry systems are vehicle-type agnostic. Custom panels can be added for domain-specific data like payload status, engine telemetry, or sensor readings.
5. How do I handle MAVLink v2 signing in QGC?
QGC supports MAVLink v2 signing natively. Configure signing key and flags in the Link settings. If your flight controller uses a custom signing scheme, you’ll need to modify the MAVLinkProtocol class to implement your authentication logic.

Pingback: QGroundControl 3D Digital Twin With Cesium and Qt (2026) – AOMWAY