


A reader recently messaged me asking how to set up a multirotor running an open-source flight controller to follow a ground vehicle — essentially having the aircraft trail a moving car at a fixed distance from behind, similar to DJI’s ActiveTrack visual tracking on consumer camera drones.
The good news: this capability is actually quite straightforward with open-source flight controllers, because ArduPilot has a built-in Follow Me function. Whether you use Mission Planner or QGroundControl as your ground station, it works. Today I’ll walk through the full setup using Mission Planner.
First, let’s briefly explain the principle and scenario.
You’ll need a laptop running Mission Planner, connected to an external USB GPS module that continuously outputs coordinates. These coordinates are sent to the aircraft via a wireless telemetry link. When the flight controller receives the position updates, it automatically flies to a point above the vehicle and follows it. Throughout the process, the pilot must keep the RC transmitter in hand — if anything goes wrong, you can immediately switch to manual control and take over.
1. Required Hardware Checklist
1. Complete drone system: ArduCopter / APM flight controller, GPS module, multirotor airframe, RC transmitter
2. Wireless telemetry radio set — a standard 800/900 MHz telemetry link works great. Cheap and reliable.
3. Laptop with Mission Planner installed — one unit
4. External USB Bluetooth GPS module — available online. Important! Do NOT use your phone’s built-in GPS if at all possible. Smartphone GPS accuracy is poor and can cause significant drift during follow-me, making the aircraft wander erratically.
5. Vehicle USB power adapter / car charger — keep the laptop powered throughout the session so it doesn’t die mid-operation.
2. Pre-Flight Parameter Configuration
Step 1: Connect to the flight controller and enter the parameter tuning interface
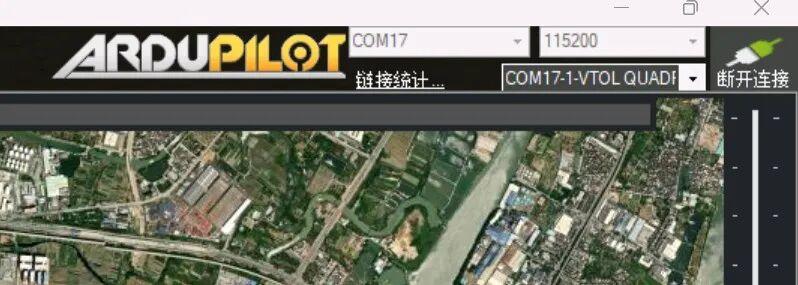
1. Power up the drone. Connect the USB telemetry radio ground unit to your laptop.
2. Open Mission Planner. In the top-left corner, select the COM port for the telemetry radio, set baud rate to 115200, then click Connect.
3. Once connected, a green icon appears at the top — connection is live.
Step 2: Configure the flight mode switch
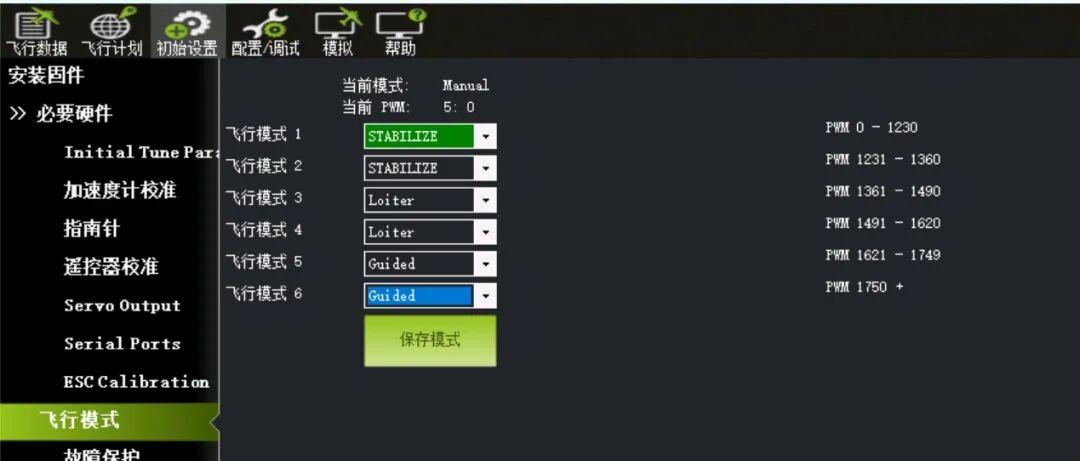
1. Go to Initial Setup → left sidebar menu → Flight Modes
2. Assign an unused channel on your RC transmitter — recommend CH5 three-position switch:
– Position Low: Stabilize (manual self-leveling mode — your emergency bailout switch)
– Position Mid: Loiter (position hold / hover)
– Position High: Guided (guided mode — Follow Me depends on this mode)
3. Click Write Params at the bottom to save the mode configuration.
Step 3: Key Follow Me parameter settings
Go to Config/Tuning → Full Parameter List. Search and modify the following parameters one by one:
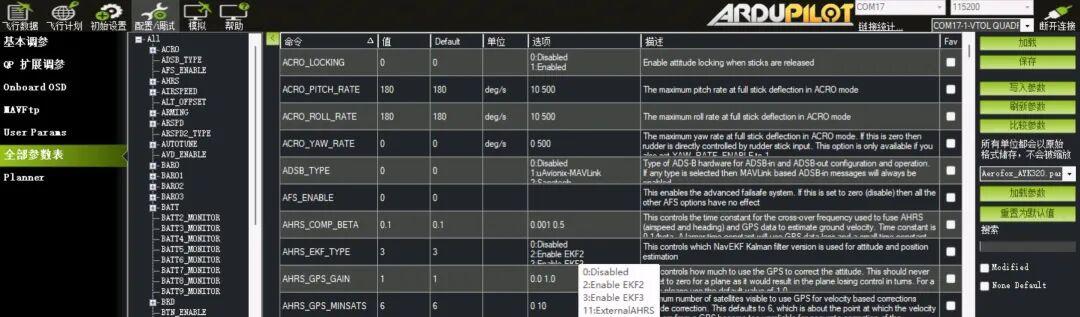
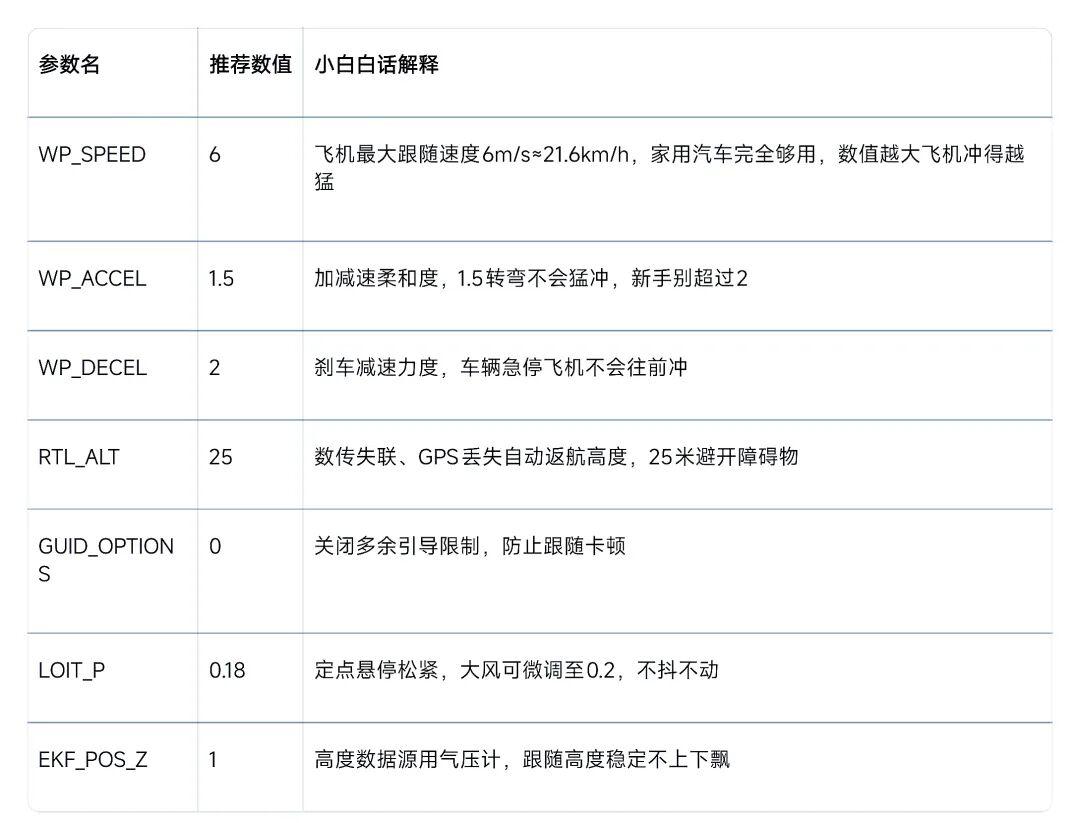
After changing all parameters, be sure to click Write Params on the right side of the page to save. After saving, power-cycle the flight controller once (unplug and replug) for the parameters to fully take effect.
Step 4: Test basic Guided mode functionality
1. Place the aircraft on the ground, arm and take off, hover at 15 meters altitude
2. In MP’s Flight Data map view, right-click on any open area on the map and select Fly To Here
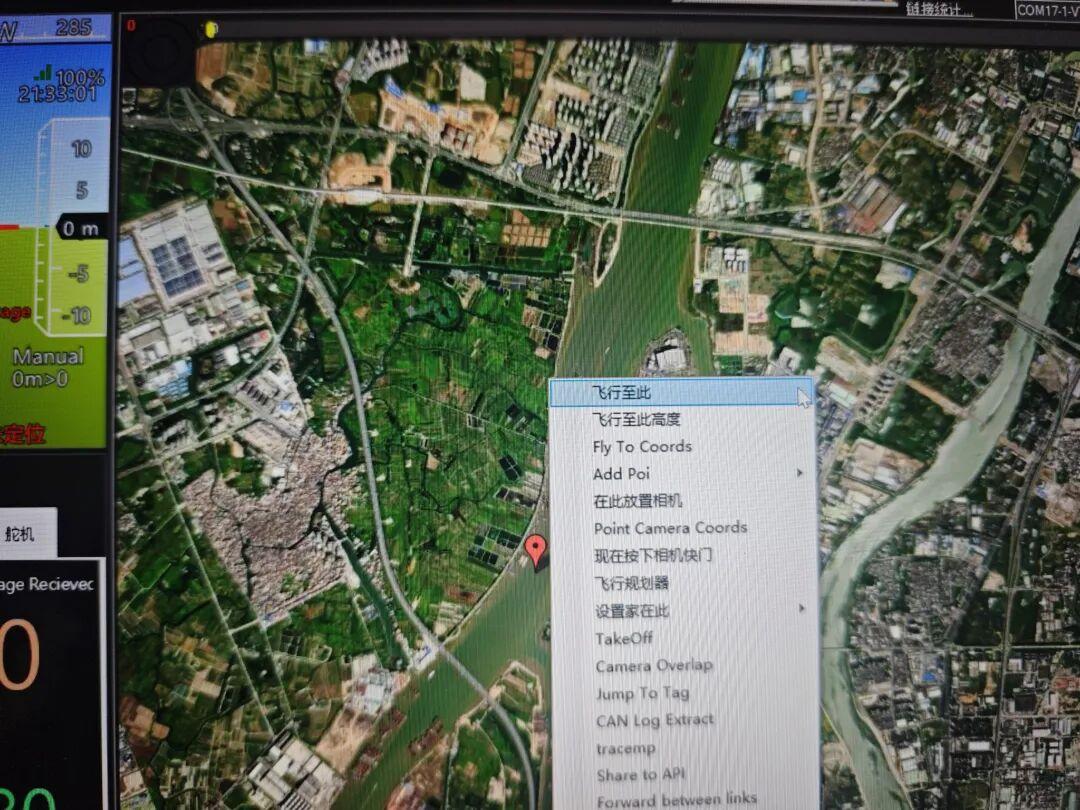
3. The aircraft should fly smoothly to the target point and hover steadily upon arrival — this confirms Guided mode is working properly
4. If the aircraft does not move or drifts randomly, first check GPS satellite count (minimum 8 satellites) and telemetry signal quality
3. Laptop GPS Hardware Connection
Step: Connect the GPS module to the computer
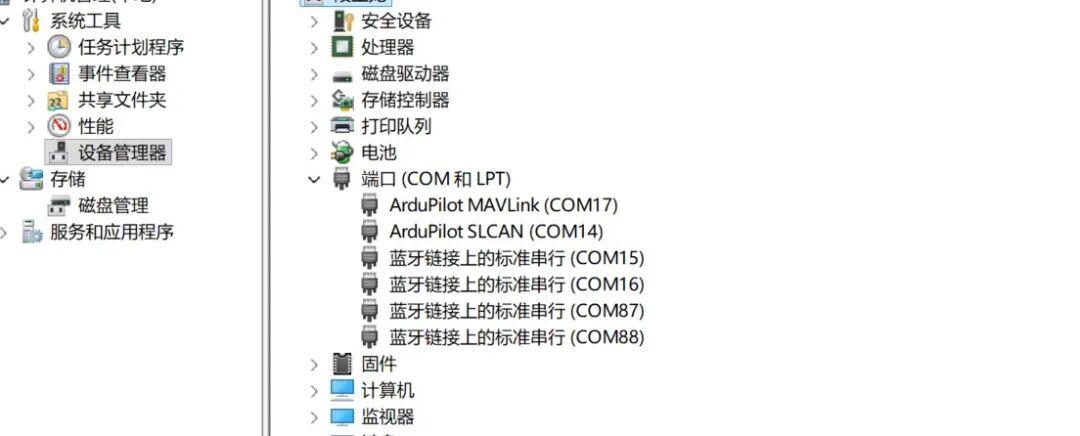
1. Plug the USB GPS into a laptop USB port — the computer will auto-install the driver
2. Right-click This PC → Manage → Device Manager → Ports (COM & LPT). Note the COM port number assigned to the GPS. The default baud rate is 9600.
4. Enabling Follow Me in Mission Planner — Complete Steps
1. With MP still connected to the aircraft, switch to the top tab: Flight Data (main flight data interface)
2. On your keyboard, press Ctrl + F — a full shortcut tool window pops up
3. In the popup window, find the Follow Me button and click it to open the Follow Me settings panel
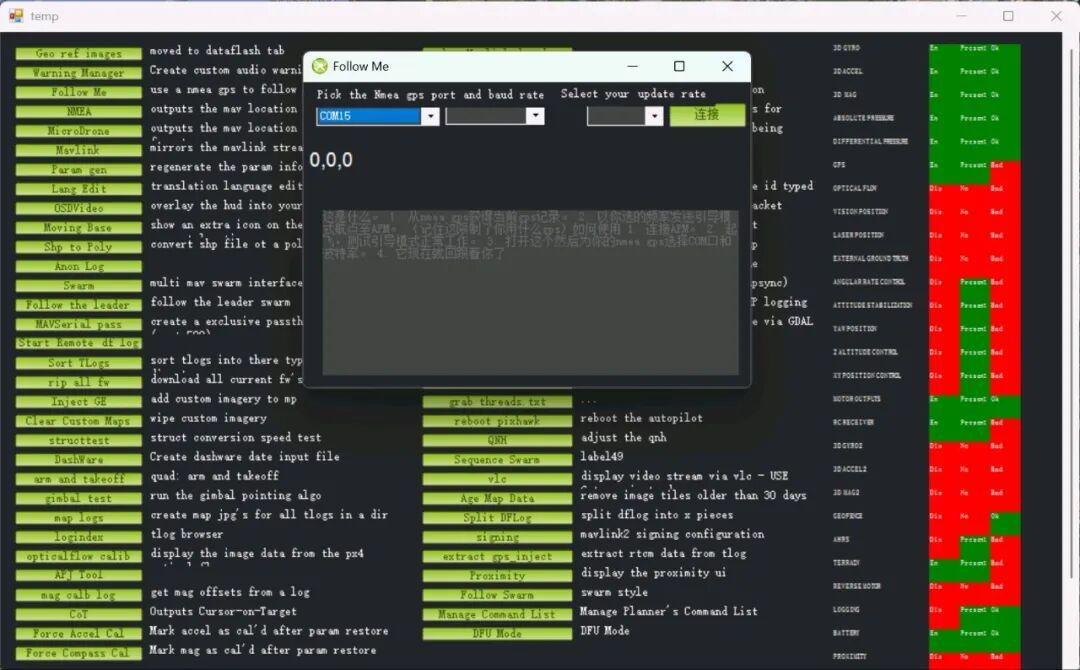
4. Core Follow Me panel settings:
1. GPS Port: Select the GPS COM port you noted earlier from the dropdown
2. GPS Baud: Enter 9600 (default GPS baud rate)
3. Update Rate — coordinate update frequency: 0.5 Hz (upload coordinates every 2 seconds — beginners should stick to this, do NOT increase it)
4. Offset X: -8 — the aircraft always stays 8 meters behind the vehicle. A positive number places the drone in front of the vehicle — extremely dangerous, do NOT attempt, always use a negative value.
5. Offset Y: 0 (zero lateral offset — directly behind the vehicle. To follow from the right side, enter 3; from the left, enter -3)
6. Offset Z: 12 (aircraft stays 12 meters above the vehicle — never less than 10 meters)
5. Once settings are complete, click Connect GPS to connect the GPS
6. The panel should show continuously refreshing latitude, longitude, and speed values — this confirms GPS data is transmitting normally. If no numbers appear, re-check the COM port and baud rate.
5. Follow-Me Flight Procedure
Pre-Flight Checklist
1. Drone powered on, GPS lock stable, satellite count ≥ 10
2. Laptop telemetry and GPS all connected normally, Follow Me panel showing GPS is connected
3. RC transmitter switch positions confirmed: Low = manual, Mid = position hold, High = guided
4. Vehicle positioned in an open, flat area — no trees, power lines, or pedestrians nearby
In-Air Operation Steps
1. Set the RC transmitter switch to Loiter (position hold), arm and take off, slowly climb above 15 meters
2. Hover in place for 30 seconds — observe whether the aircraft drifts and whether altitude hold is stable
3. Confirm that the MP Follow Me panel GPS data is continuously refreshing without interruptions
4. Switch the RC transmitter to the highest position — Guided mode — Follow Me automatically activates
5. Slowly drive the vehicle forward — start at low speed, around 5-10 km/h (3-6 mph)
6. Observe the aircraft: it should maintain position 8 meters behind the vehicle at 12 meters altitude, following smoothly
7. Increasing speed: do not exceed 20 km/h. Slow down before turns to prevent the aircraft from making sharp banking maneuvers
8. To end Follow Me: immediately switch the RC transmitter to the lowest position — Stabilize (manual mode) — this instantly exits Follow Me. The aircraft hovers in place; then land manually.
6. Beginner Safety Notes
1. Keep the RC transmitter in your hand at all times. Never take your eyes off the drone.
2. Do NOT use Follow Me in urban areas, near crowds, or anywhere near high-voltage power lines.
3. Do NOT use Follow Me in strong wind conditions — the risk of positioning drift and loss of control is significantly higher.
4. Absolutely never set Offset X to a positive number — this places the aircraft ahead of the vehicle, creating a serious collision risk.
5. Always test Guided mode functionality before takeoff.
6. The ground station laptop in the vehicle must remain powered at all times — a power loss means GPS coordinates stop transmitting, and the aircraft loses its tracking reference.
That covers everything you need to implement ground-following with an open-source flight controller. If you have questions about Follow Me setup, telemetry configuration, or integrating custom tracking solutions with your ArduPilot-based aircraft, feel free to contact Aomway at [email protected].
Have questions about this article? Feel free to contact us at [email protected] — we’re happy to help!
