


If you’ve built or flown drones, you probably have a complicated relationship with telemetry radios. A device that sends flight controller data back to your ground station — and somehow the price tag routinely lands in the hundreds of dollars.
Then someone took a $2 ESP32 chip, flashed open-source firmware onto it, and made it do exactly the same job — flight controller telemetry, flowing reliably to the ground station.
The project is called DroneBridge for ESP32, with over 900 stars on GitHub and released under the permissive Apache 2.0 license. For the price of a coffee, it replaces a dedicated telemetry radio. How does it actually pull this off?
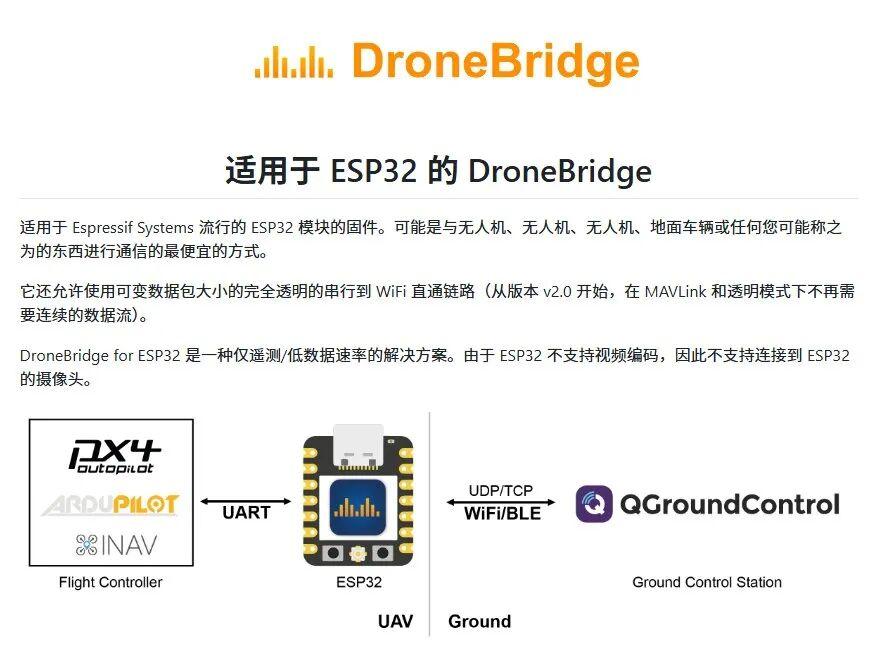
How a $2 Chip Becomes a Telemetry Bridge
Look at the official architecture diagram above, and the logic is refreshingly straightforward. The flight controller side outputs data over a serial port. The ESP32 catches it and sends it out over WiFi or Bluetooth. The ground station picks it up. That little board in the middle does exactly one thing: transparent serial passthrough.
“Transparent” means it doesn’t care what your data looks like. It natively supports MAVLink, MSP, and LTM — the three most common telemetry protocols — and works out of the box with mainstream flight controllers including PX4, ArduPilot, INAV, and Betaflight. Even if you wrote your own proprietary protocol, it would pass through as raw bytes without modification.
From your perspective, this chip is essentially an invisible serial cable: between the flight controller and your ground station, where you’d normally need a telemetry radio link, both ends of that link now plug into a $2 board.
The immediate question, of course: for something this cheap, how far can it go, and is it actually reliable?
Cheap Doesn’t Mean Crude: ESP-NOW Extends Range to 1 km, Fully Encrypted
Standard WiFi direct mode gives you about 150 meters of range — enough for flying around the backyard, but pushing further gets dicey.
The real key is ESP-NOW. This is Espressif’s own connectionless communication protocol — no handshake overhead for establishing a connection, lower latency, stronger interference resistance, and significantly longer range than regular WiFi. With ESP-NOW or Long Range (LR) mode enabled, and ESP32 chips on both ends, the communication range stretches to approximately 1 km — roughly six times that of standard WiFi.
The genius isn’t that it’s cheap. The genius is that it’s cheap and doesn’t cut corners.
DroneBridge deploys AES-GCM 256-bit encryption across all modes, including ESP-NOW broadcast data. This is uncommon in low-cost solutions — many budget wireless passthrough modules transmit in plaintext, readable by anyone nearby with a receiver.
There’s also a practical refinement: starting from v2.0, MAVLink and transparent modes no longer require a constant data stream to keep the link alive. No more sending heartbeat packets just to prevent the connection from dropping.
Technical foundations covered. Now the real question: how many steps does it take to go from a bare board to a working telemetry link?
From Bare Board to Connected Ground Station — Three Steps
The short answer: flash firmware, wire it up, configure the network. The first two are one-time operations; after setup, you barely touch configuration again. Here’s each step in detail.
Step 1: Flash the firmware. The goal is to transform a generic ESP32 into a DroneBridge device. The recommended path is the official web-based flashing tool — open the page in a browser, plug in the board, click once, done. No build environment, no command line. This path has the fewest dependencies and the lowest error rate; beginners should take it without hesitation. One caveat: web-based flashing relies on the browser’s serial API, so use Chrome or Edge — unsupported browsers won’t work.
Step 2: Connect the ESP32 to your flight controller. Firmware is on the board — now for wiring. Connect the ESP32’s UART to a 3.3V serial port on your flight controller, then configure that serial port in the flight controller for your chosen protocol (e.g., MAVLink). The most critical warning: do not use the pins labeled TX/RX — those are often reserved for the board’s internal serial interface. Check the board’s datasheet to confirm voltage tolerance before wiring, because only some modules can handle levels above 3.3V; connecting to the wrong voltage can fry the chip instantly.
Step 3: Configure the network — once. Wiring done, now set the wireless parameters. After flashing, the ESP32 will broadcast its own WiFi hotspot. Connect to it, open the configuration page in a browser, set the protocol and serial parameters, and hit save. That’s it.
WiFi SSID:  DroneBridge ESP32
Password:  dronebridge   # Don't leave the default — change it.
Config page: 192.168.2.1  or  dronebridge.local

Ground station connection: TCP port 5760  or  UDP port 14550
A subtle but common pitfall: when accessing the config page from a phone, if mobile data is enabled, the browser may route through the cellular connection instead of the WiFi hotspot. Temporarily disable mobile data to force the browser onto the ESP32’s network.
After this one-time configuration, daily use boils down to a single action: open your ground station software (QGroundControl, Mission Planner, or similar), connect to the ESP’s TCP 5760 or UDP 14550, and telemetry flows. For UDP mode, the ground station must send an initial heartbeat packet so the ESP32 recognizes and registers it as a receiver. From then on, every flight session works the same way — power on, connect, done. No more config pages.
It Replaces the Telemetry Radio — Not the Video Link
This solution is excellent, but the boundaries need to be clear — otherwise you might order one expecting capabilities it doesn’t have.
Telemetry only. No video. DroneBridge for ESP32 is a telemetry-only, low-data-rate solution. The ESP32 lacks hardware video encoding, so camera feeds and FPV video are entirely out of scope. Attitude data, GPS coordinates, battery voltage, waypoints — all of that passes through without issue. But if you want real-time FPV video, you still need a dedicated video transmitter. This chip cannot fill that gap.
Long range has prerequisites. The ~1 km figure assumes ESP32 chips on both ends with Long Range or ESP-NOW mode enabled. In standard WiFi mode, expect roughly 150 meters. To reach that 1 km benchmark, both ends need to be running matching hardware and modes.
So here’s the one-line scope definition: if your requirement is purely a telemetry link — and you’re willing to flash firmware and wire a board yourself — then this $2 chip genuinely replaces that $100+ radio. If you need video transmission, or want something that works plug-and-play out of the box with zero tinkering, this isn’t your solution.
For independent hardware developers and FPV enthusiasts, this is that rare category of solution: cut costs without cutting corners. Do you have a neglected ESP32 or two in your parts drawer? Even if you’re not flying drones right now — the moment a project calls for “microcontroller + low-latency wireless passthrough,” this open-source codebase deserves a spot in your bookmarks. It may be the cheapest telemetry radio you never knew you already owned.
GitHub Repository: https://github.com/DroneBridge/ESP32
At Aomway, we know that a reliable telemetry link is the nervous system of every FPV drone — carrying attitude, GPS, voltage, and RSSI from the aircraft to the pilot’s decision loop. DroneBridge for ESP32 demonstrates a principle we believe in: that open-source, community-driven innovation can deliver professional-grade capability without the professional-grade price tag. Whether you’re flying an Aomway Commander system with Betaflight telemetry over MSP, running ArduPilot missions with MAVLink, or building a custom UAV from the ground up, this $2 firmware stack is a powerful reminder that the barrier to entry for serious drone telemetry has never been lower. If you have questions about integrating telemetry into your FPV workflow, or how to get the most out of your Aomway ground station setup, contact us at [email protected].
Have questions about this article? Feel free to contact us at [email protected] — we’re happy to help!
Frequently Asked Questions
1. Can I use a single ESP32 on the ground station side with a regular WiFi adapter on my laptop?
Yes, but with a range caveat. In standard WiFi mode, the ESP32 broadcasts as a soft AP, and your laptop connects directly — range is limited to ~150 meters. To unlock the full ~1 km ESP-NOW range, you need an ESP32 on both ends: one on the drone (air unit) and another connected to your ground station computer via USB, running in ESP-NOW receiver mode. The ground-side ESP32 then bridges to your software via serial or TCP. This two-ESP32 configuration is the recommended setup for anything beyond line-of-sight proximity flying.
2. Which flight controller serial port should I use, and what baud rate?
Use any available free UART on your flight controller — typically UART2, UART3, or a dedicated Telemetry port. Configure it for the protocol your ground station expects (MAVLink, MSP, or LTM). Baud rate should match between the flight controller and the DroneBridge ESP32; 115200 is the most common default and works reliably for telemetry data rates. For MAVLink on ArduPilot or PX4, set the serial port’s protocol to “MAVLink 2” and the baud rate to 115200 or 57600 depending on your needs. On Betaflight, set the port to “MSP” at 115200 for telemetry passthrough.
3. How does ESP-NOW differ from regular WiFi, and why does it give longer range?
ESP-NOW is a connectionless, peer-to-peer protocol designed by Espressif specifically for ESP32 chips. Unlike standard WiFi (which negotiates connections, manages associations, and handles retransmissions at the MAC layer), ESP-NOW sends packets immediately with minimal overhead — no association handshake, no beacon frames, no DHCP. Each packet carries the destination MAC address and payload, transmitted directly. The reduced protocol overhead means lower latency, and the simplified PHY-layer modulation options (including LR mode with DSSS spreading) improve the signal-to-noise ratio at the receiver, extending effective range. The trade-off is that ESP-NOW is an Espressif-specific protocol — only ESP32-family chips speak it.
4. What happens to telemetry if the ESP32 loses WiFi connection mid-flight?
DroneBridge is a unidirectional telemetry relay — it forwards data from the flight controller to the ground station. If the wireless link drops, data is simply not received at the ground station during that interval; the flight controller continues operating normally because telemetry is outbound-only and does not affect flight control. No data is buffered or retransmitted after reconnection because telemetry data is time-sensitive — stale attitude and GPS data from seconds ago has no value. When the link re-establishes, telemetry resumes immediately. The link-keepalive improvement in v2.0 means the ESP32 won’t require a reconnection handshake if the interruption is brief.
5. Can I power the ESP32 directly from the flight controller?
Yes, and it’s the recommended approach. Most flight controllers provide a regulated 5V output that can power an ESP32 dev board via its VIN or 5V pin. A typical ESP32 draws 80–250 mA depending on WiFi TX power, which is well within the capability of most FC 5V BECs. Avoid powering the ESP32 from a 3.3V pin on the flight controller — the ESP32’s peak current draw during WiFi transmission can exceed what a typical 3.3V LDO on a flight controller is rated for. If your build is weight-sensitive, use a bare ESP32 module (not a full dev board) and a separate 3.3V regulator rated for at least 500 mA.
